Welcome To Knits-n-Knacks
|
Our Spring/Summer 2010 newsletter is now on-line! You can access it from either the announcements menu above or on the left |
Our new class list is posted! – see our newsletter
DIY Tabletop Epoxy Projects
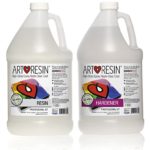 One big seller in arts and craft stores is epoxy. However, not everyone realizes how many different things you can use it for. Most people simply want to use it to cover a wooden table for their dining room or a small end table for their living room. These ideas are fine, but some people are able to take it to the next level. They have discovered the joys of DIY tabletop epoxy projects.
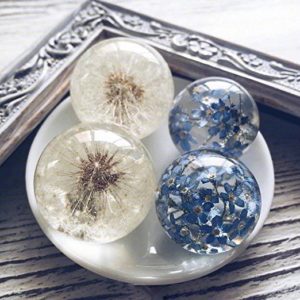
Creative Ideas
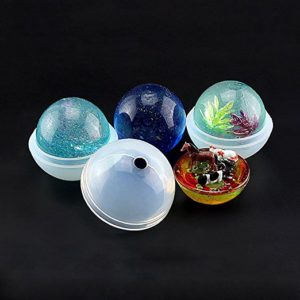 It has become a trend among many to do more with epoxy. They are collecting pennies to pour an epoxy resin over them to create a table that stands out on their patio or in their sun room. Many people are also using sea shells to create a coffee table top for their beach themed homes. Farm house tables look great when covered with a few layers of epoxy, but they look even better if the epoxy is tinted to bring out the natural color in the wood. You can paint pictures on a wooden surface and then epoxy it to seal it in or place a picture that your child painted onto a canvas on a table to preserve it for years to come. Many people also use photographs, scrapbooking supplies, or leaves on the table to create a collage. Most epoxy is clear so that the colors will never become messed up by using it and you can cover a variety of things with it. Your creative mind is the only restriction.
How to Prep the Surface Area
When doing epoxy on a table, you need to make sure that the table top is cleaned thoroughly. You may even want to wipe it down with alcohol if you feel that there may be a little grease or oil on it. After that, you will need to lightly sand the surface down. This will remove any nicks in the wood or further eliminate built up dirt. Wipe the table top down again after you are finished sanding to remove dust. Before you pour epoxy, make sure your table has a small lip around its top to keep the epoxy from running off the table. You should also tape the edge using painters tape to prevent it from oozing between cracks.
Cost to Create Epoxy Tables
The price of creativity will depend on the project that you are doing. If you are printing photos or using scrapbooking items or shells, you may have some cost there. The price of the table you are creating, if you purchase it for the project will come into the total cost. You will also have the price of the epoxy. Most epoxy products are affordable and you can have a newly refurbished piece of furniture for less than $100 that looks like it should be much more valuable than that.
Read More
Crafty Reupholster Ideas
Have you ever seen a piece of furniture that you absolutely loved, but opted to avoid it because it needed too much work done to it? Most people today love the challenge of turning something that is very old into something new. Old end tables are getting new paint to turn them into something that is once again beautiful. Old chairs that have been owned by our parents are now being brought into our home and covered by blankets, instead of being recovered by something that doesn’t bunch up. Instead of the blanket that you must constantly adjust, why not simply reupholster your most favorite chair? It is easy to do. All you have to do is decide to show your creativity.
Why Reupholstering Is So Popular
Most furnishings from years ago was made better than the furniture we can buy today. Often the end tables were made of real wood and couches were made more comfortable. There is also no reason to try and deny that an older, well-worn piece of furniture sits better than something new. It is also cheaper to recover than consider buying new. Especially when you are attempting to furnish a nursery or something similar.
You can reupholster that old rocking chair that sits in the attic from when you were a child or that you found at a yard sale by simply changing out the padding that may be on it. Crib gliders are no different. Often, the best nursery glider available today will not compare to the ones created a few years back. They are not used long enough to wear them out, but they are often used long enough to make the cushions look dirty and well-used. You can handle the task. Repurposing one of these items by adding a little cloth to it, is easier than you may expect.
How to Handle Reupholstering
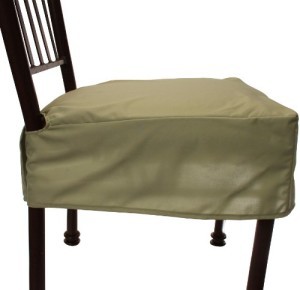 Reupholstering is easy to do, provided you have a basic knowledge of what it will take. Your first major task will be to choose a fabric that you want to use. For instance, if the best nursery glider you can find is one that is several years old, but pink and you would prefer it to be blue with sailboats on it, then you should find the material you want for it. Most gliders have cushioning that attaches to them. This means that you will want to make sure you have enough material to cover all of the padding that you see.
Reupholstering will be easier if the material that is already covering it is still solid, meaning that it is not torn. If this is the case, you will need to remove the cushioned area from the glider and lay out the new material. Staple it to the backside and then reattach it to the chair. If the material is torn, you may want to purchase new padding to hide the tears and staple both the padding and the new covering to the back before reattaching. Either way, you need to make sure that the new material is pulled tightly and stapled so that it does not pull free.
What Will You Re-Purpose?
Virtually anything in your home or nursery can be reupholstered. There are no limits to the possibilities when it comes to repurposing. However, the one thing you should not try to recover is a crib mattress. For that, you will need to simply read through the baby crib mattress reviews and find a new one because it is the best way to ensure your baby is sleeping in a safe area. Other than that, have fun redecorating the treasures you find at an affordable price and make them your own.
Read MoreQuick Tips For Car Washing
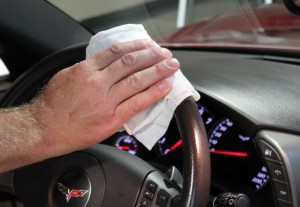 Since the invention of people’s most prized possession, their vehicle, there has been an ongoing battle regarding how to clean it and when. It is a task that most people hate to do, but love it when they do decide to take care of it. Often, even though people know that they will be glad they did clean their vehicle, they still end up putting it off for weeks and sometimes months, just because it takes so long to properly wash, wax, and clean out their car.
This means that every time you go into town, you are most likely going to see a car or several vehicles that need a wash from a professional detailer or DIY folks who use pressure washers. Before washing your car with equipment, make sure you know the differences between an electric vs gas pressure washer. Why let your vehicle be one of the dirty ones you see? Do you want other people to say, “Wow, he needs to wash his car”? Instead of feeling shame over the fact you neglect your vehicle, why not discover the best way to clean your car?
After you remove the trash that may be in your vehicle as well as random toys, if you have kids, you will want to protect any leather that you may have, using a cleaner which will oil the leather areas. You may also consider using something on your dashboard, side panels, and other areas within your vehicle. This will ensure that sun damage and general wear and tear does not affect those areas.
When you have finished wiping things down, you may want to vacuum out your car. A shop Vac, a vacuum that is designed for vehicles, or any other vacuum with a hose will work. However, the floor mats sometimes benefit more if you take them out and beat them against something because they are where most of your dirt ends up. Some vacuums are unable to get all of the dirt out of them. A brush may also be used.
Upholstery cleaner is also sometimes necessary. In most cases, normal carpet and upholstery cleaner will work fine. If you are using a new brand or if you have never had a need to clean your vehicle interior, you may want to find a place that is not easily seen to ensure that it does not mess up the color of your interior, but damage to upholstery because you clean it is not very common. Applying a stain guard may also be a benefit if you have children who have snacks within your vehicle sometimes.
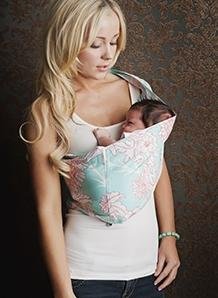
Read MoreThe Perfect Material to Make a Baby Wrap
Even with all of the baby wraps that are available, some people still want more color options. If it isn’t colors that they want, they want to avoid the cost of buying several. Regardless of which reason you have, it has already been proven that you can make your own baby wrap and it is cost effective and easy to do. All you have to do is visit your local craft store and explore all of your new options. The hardest part is going to be finding the perfect material to make a baby wrap.
Choose the Right Materials
 Most people have their own ideas regarding the “right” material to use. Some say that a woven material, such as Osnaburg is best because it is permanently pressed. It is a little stiff, but it will soften after you wash it several times. Another option is monk’s cloth, gauze fabric, or even a jacquard weave tablecloth.
In short, anything that is made of cotton or other natural fibers is probably going to be your best option. You will want a material that is breathable, meaning that when you hold it up to a light source, you can see light through it. Even the Best Baby Carrier available is made using 100% cotton. The only type of cotton to really avoid is the quilters’ cotton because of the extremely tight weave.
If you are carrying an infant, a stretchy material or even a knitted fabric may be okay, however, as the child grows, you may not want to use this type any longer because of how much it will stretch. Other types that most moms do not recommend is polyesters that are shiny and satin, leather, and other types of fabric that simply do not breathe well.
As you look around the internet, you will notice that both Jersey and fleece materials are questionable. Some parents love them, others say avoid them at all costs. This alone proves that as long as you are comfortable with the material you choose, you can make a baby wrap or sling with it.
Accessorize Your Baby Sling
 When researching, “How to Make a Baby Sling” you will find a variety of suggestions. You will find the length of materials that you need to use and whether you need to sew it or not. In some cases, you may also discover that by creating your own, you will be able to accessorize it a little to make it feel more stylish for you.
Baby wraps are designed to wrap around you multiple times. It goes over both of your shoulders and then wraps around your waist. From there, you tie it off to create the pouch where your baby will sit. The baby slings only go over one of your shoulders and typically use a ring at the shoulder to keep it tight enough to hold your little bundle. With either of these baby carrier styles you can use simple bangle bracelets, napkin rings, or any other type of circled object to accessorize your wrap.
These circles can be found in craft stores, department stores, antique stores, or other places. Many women already have them in their jewelry boxes. There are even hair accessories that have a circular shape and some have a straight bar across the middle. These would be great to add style to the wraps if you want to put one on each shoulder.
Read MoreBest Seasons to Host Your Wedding
When people think of summer they often think of beaches, lakes, and pools. The summer also gives bloom to natural beauty. You can bring it all into play within your wedding color scheme as long as you set your mind to do it. The best part is, you do not have to be outdoors to create the summertime experience.
 Even if you are hoping to go with the traditional white wedding, you can still warm it up by including bold reds and earthen greenery into the decor. A white dress with a red rose bouquet, table tops, and other red things will keep the atmosphere from feeling too cold for the summer months. Others who think of a summer wedding want to stick to the bold colors. which can flourish in pictures. Don’t fear over the average cost of a wedding photographer as they can make you look fabulous. Coral, orange, and even yellow can work great. You can choose citrus centerpieces for the reception area.
If you simply want to bring the fun of swimming to an indoor wedding, make sure you use the blues, blue greys, and other colors that naturally make people think of sandy beaches. A sea foam green could also work out well if you prefer this over other colors. With this color scheme, you also have the option to combine them with more “sandy” colors to completely immerse your guests into the “summer” you have created. By doing this, you should perhaps include more tropical flowers and colors for your bridesmaids that match them.
Create a Beautiful Fall Wedding
Autumn is one of the most dramatic seasons. With it, you will discover a variety of rich colors, often all at one time. This includes the oranges, browns, yellows, reds, and greenery colors that everyone sees only during the fall. You can bring the outdoors into your ceremony and create a very warm, romantic atmosphere. However, your color choices can range from various purple and lavenders to peach if you choose to have them instead. Some people also use berries as a part of their decor and color choices during the fall season.
If you do choose the earthen tones of fall for your wedding, you are not confined by solid colors. Two toned color choices are also a very popular idea. This includes flowers that have multi colored petals and even fall colored leaves to create a truly rustic and natural setting.
You only get one chance to make your wedding day beautiful. This means that regardless of what season you plan to hold your ceremony, there are a variety of ways to make it a beautiful, natural feeling setting by using colors. Simply choose your favorite color for the season and plan around what you hope to create, whether indoors or out. You should also make sure that the choices you make are easily available in your area, especially where the flowers are concerned and this will play an important part of choosing the best wedding colors for every season.
Read MoreAre You Ready?
Are you ready for the ginormous snowstorm we’re supposed to get? I know you’ll think I’m more than a little strange, but I love big snowstorms!
I love being snowed in, baking something good, putting on a big pot of soup, and knitting! For some reason, I don’t feel like I have to do the usual work around the house that I would normally do on a day off. I hope it really comes so I’ll have an excuse to put on a good movie, snuggle under a warm blankie, and knit! Frankly, I’ll believe it when I see it!
If it turns out the forecasters are wrong and we don’t get snowed in, we’ll be starting the Wrap Me Up knit-along tomorrow afternoon. Block 1. You can see pictures of the shawl on our website. Come join us. It will be fun!
Read MoreSpring Is In The Air
Spring is in the air (at least for a little while)! Today is a beautiful sunny day and I’m enjoying every bit of it as I hope you are too.
This afternoon is the Purls and Prayers shawl knitting group from 4:00-5:30. Feel free to come and join us.
For those of you doing the Wrap-me-up shawl knit-along with us, we were snowed in on Wednesday two weeks ago so were a week late in starting. Therefore, we have completed block one and are ready to take up block two. I have been informed, however, that several eager beavers have not been able to control themselves and have knitted on past that point. If you have not yet started yours, it’s not too late!
Hopefully, we’ll see you soon!
Read More